BUY MY BLINDS ONLINE
Installation Guide
Fit your new blinds like a pro. Find your product below and follow the steps for Inside or Outside fitting.
25mm / 35mm Aluminium Venetian Blinds
Before You Start
Unpack your aluminium venetian blind(s) carefully, taking care not to damage the blinds or cords when cutting through the packaging. Unwrap the plastic wrapped around the slats. Included with your blind(s): universal brackets, gold screws, and Fischer plugs.
-
Step 1 — Find your bracket positions
Look inside the headrail to familiarise yourself with the inner components — these keep the blind working smoothly, so make sure your brackets won't interfere with them. Hold the blind up in the window to work out where to drill: normally 150mm in from the left, and 150mm in from the right.
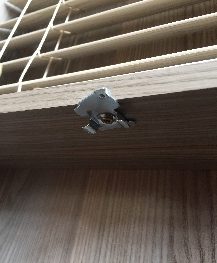
Bracket — open 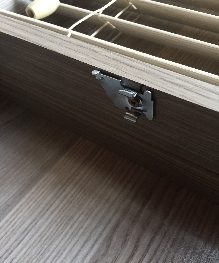
Bracket — closed -
Step 2 — Mark your drill points
Place the bracket with its front edge flush with the front edge of your wall recess — this keeps the blind sitting flush, though you can install it deeper if you prefer. Mark your drill points with a pencil. Blinds wider than 1200mm will need a support bracket in the middle.
-
Step 3 — Drill
Drill your marked points with a 6mm drill bit.
-
Step 4 — Fix the brackets
With the holes drilled, insert the Fischer plugs. Push the gold screw through the bracket and into the wall, and fix it in place with a Phillips screwdriver. Tip: an electric drill/screwdriver makes this much easier. Don't over-tighten — the bracket still needs to swivel slightly.
-
Step 5 — Fit the blind
With all your brackets open, lift the blind up over the brackets and push it flush into the top of the recess. Holding the blind up with one hand, close each bracket one by one with the other. Before letting go, give the blind a gentle tug to check it's secure.
Bracket in the open position 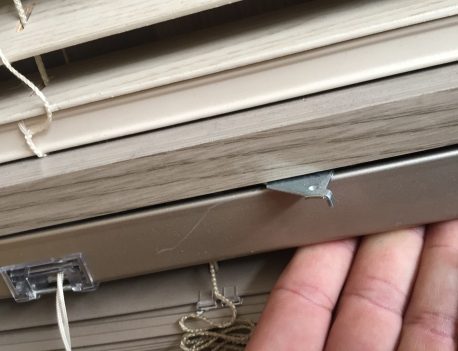
Bracket closed & blind fixed -
Step 6 — Test the cord lock
Take the cords and pull them gently to the opposite side of the control. You'll hear a small click — that's the cord lock releasing. Keeping your hand in place, slowly let go of the cord. The moment you move your hand back toward the control side, the blind will lock.
-
Step 7 — Tilt the slats
With the slats down, use the plastic wand to tilt them clockwise and anti-clockwise. Don't pull down on the wand.
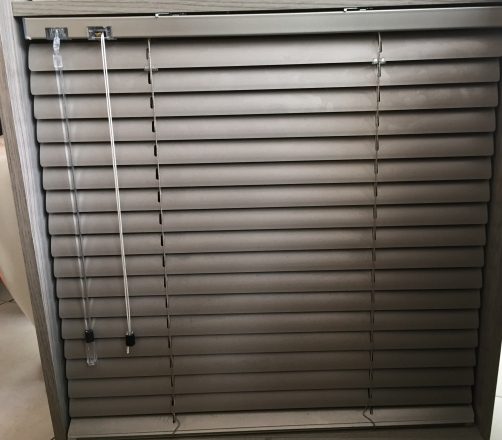
A perfectly installed 25/35mm venetian -
Step 8 — You're done!
Congratulations — you've installed your own blind! You now have a premium, custom-made blind backed by a full 2-year warranty. Tell your friends, and we'll be waiting for your next order.
Before You Start
Unpack your aluminium venetian blind(s) carefully, taking care not to damage the blinds or cords when cutting through the packaging. Unwrap the plastic wrapped around the slats. Included with your blind(s): L-shaped universal brackets, gold screws, and Fischer plugs.
-
Step 1 — Find your bracket positions
Look inside the headrail to familiarise yourself with the inner components — these keep the blind working smoothly, so make sure your brackets won't interfere with them. Hold the blind up in the window to work out where to drill: normally 150mm in from the left, and 150mm in from the right. We're installing your blind to the front of the wall, so measure up 50mm.
-
Step 2 — Mark your drill points
Place the bracket's front edge flush with the front face of the wall. You can mount higher than 50mm from the edge if you wish — just make sure you allowed for that in your measurements. Mark your drill points with a pencil. Blinds wider than 1200mm will need a support bracket in the middle.
-
Step 3 — Drill
Drill your marked points with a 6mm drill bit.
-
Step 4 — Fix the brackets
With the holes drilled, insert the Fischer plugs. Push the gold screw through the bracket and into the wall, and fix it in place with a Phillips screwdriver. Tip: an electric drill/screwdriver makes this much easier. Don't over-tighten — the bracket still needs to swivel slightly.
-
Step 5 — Fit the blind
With all your brackets open, lift the blind up over the brackets and push it flush into the top of the recess. Holding the blind up with one hand, close each bracket one by one with the other. Before letting go, give the blind a gentle tug to check it's secure.
-
Step 6 — Test the cord lock
Take the cords and pull them gently to the opposite side of the control. You'll hear a small click — that's the cord lock releasing. Keeping your hand in place, slowly let go of the cord. The moment you move your hand back toward the control side, the blind will lock.
-
Step 7 — Tilt the slats
With the slats down, use the plastic wand to tilt them clockwise and anti-clockwise. Don't pull down on the wand.
A perfectly installed 25/35mm venetian -
Step 8 — You're done!
Congratulations — you've installed your own blind! You now have a premium, custom-made blind backed by a full 2-year warranty. Tell your friends, and we'll be waiting for your next order.
50mm Aluminium Venetian Blinds
Before You Start
Unpack your aluminium venetian blind(s) carefully, taking care not to damage the blinds or cords when cutting through the packaging. Unwrap the plastic wrapped around the slats. Included with your blind(s): universal brackets, gold screws, Fischer plugs, and a blind cleaner.
-
Step 1 — Find your bracket positions
Look inside the headrail to familiarise yourself with the inner components — these keep the blind working smoothly, so make sure your brackets won't interfere with them. Hold the blind up in the window to work out where to drill: normally 150mm in from the left, and 150mm in from the right.
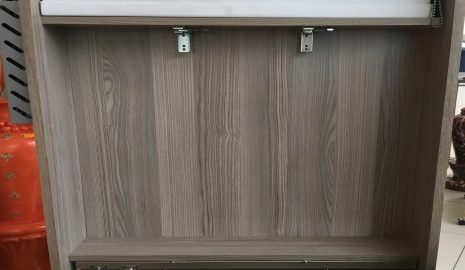
Brackets kept away from the sides -
Step 2 — Mark your drill points
Place your bracket's front edge 10mm back from the front of your wall recess — this keeps the blind flush and leaves enough room to fit later. You can install it deeper if you prefer. Mark where to drill with a pencil; you'll see a front and back hole for the screw. Please check with us if your blind is wider than 200mm, as it may need a support bracket in the middle.
-
Step 3 — Drill
Drill your marked points with a 6mm drill bit.
-
Step 4 — Fix the brackets
With the holes drilled, insert the Fischer plugs. Push the gold screw through the bracket(s) and into the wall, and fix in place with a Phillips screwdriver. Tip: an electric drill/screwdriver makes this much easier. Don't over-tighten — the bracket still needs to swivel slightly.
-
Step 5 — Fit the blind
With all your brackets open, lift the blind up over the brackets and push it flush into the top of the recess. Holding the blind up with one hand, close each bracket one by one with the other. Before letting go, give the blind a gentle tug to check it's secure.
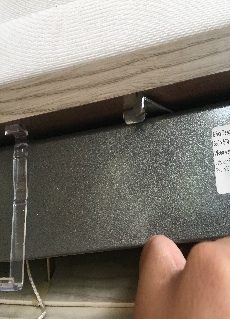
Blind up against the recess — open 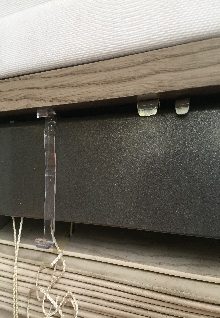
Blind fixed — bracket closed -
Step 6 — Test the cord lock
Take the cords and pull them gently to the opposite side of the control. You'll hear a small click — that's the cord lock releasing. Keeping your hand in place, slowly let go of the cord. The moment you move your hand back toward the control side, the blind will lock.
-
Step 7 — Tilt the slats
With the slats down, use the two single operating cords to tilt them by pulling down gently. Don't force them down once they've already tilted to a closed position.
-
Step 8 — You're done!
Congratulations — you've installed your own blind! You now have a premium, custom-made blind backed by a full 2-year warranty. Tell your friends, and we'll be waiting for your next order.
Before You Start
Unpack your aluminium venetian blind(s) carefully, taking care not to damage the blinds or cords when cutting through the packaging. Unwrap the plastic wrapped around the slats. Included with your blind(s): universal brackets, gold screws, Fischer plugs, and a blind cleaner.
-
Step 1 — Find your bracket positions
Look inside the headrail to familiarise yourself with the inner components — these keep the blind working smoothly, so make sure your brackets won't interfere with them. Hold the blind up in the window to work out where to drill: normally 150mm in from the left, and 150mm in from the right. We're installing your blind on the outside/front of your wall, so measure up 50mm.
-
Step 2 — Mark your drill points
Place your L-shaped bracket with its back edge flush against your wall. You can mount higher if you wish — just make sure you allowed for that in your measurements. Mark where to drill with a pencil; you'll see a top and bottom hole for the screw. Blinds wider than 1200mm will need a support bracket in the middle.
-
Step 3 — Drill
Drill your marked points with a 6mm drill bit.
-
Step 4 — Fix the brackets
With the holes drilled, insert the Fischer plugs. Push the gold screw through the bracket(s) and into the wall, and fix in place with a Phillips screwdriver. Tip: an electric drill/screwdriver makes this much easier. Don't over-tighten — the bracket still needs to swivel slightly.
-
Step 5 — Fit the blind
With all your brackets open, lift the blind up over the brackets and push it flush into the top of the recess. Holding the blind up with one hand, close each bracket one by one with the other. Before letting go, give the blind a gentle tug to check it's secure.
Blind up against the bracket — open Blind fixed — bracket closed -
Step 6 — Test the cord lock
Take the cords and pull them gently to the opposite side of the control. You'll hear a small click — that's the cord lock releasing. Keeping your hand in place, slowly let go of the cord. The moment you move your hand back toward the control side, the blind will lock.
-
Step 7 — Tilt the slats
With the slats down, use the two single operating cords to tilt them by pulling down gently. Don't force them down once they've already tilted to a closed position.
-
Step 8 — You're done!
Congratulations — you've installed your own blind! You now have a premium, custom-made blind backed by a full 2-year warranty. Tell your friends, and we'll be waiting for your next order.
50mm Wood/Plastic Venetian Blinds
Before You Start
Unpack your wooden venetian blind(s) carefully, taking care not to damage the blinds or cords when cutting through the packaging. Unwrap the plastic wrapped around the slats. Included with your blind(s): universal brackets, gold screws, Fischer plugs, a wooden valance to cover your headrail, valance clips, and a blind cleaner.
-
Step 1 — Find your bracket positions
Look inside the headrail to familiarise yourself with the inner components — these keep the blind working smoothly, so make sure your brackets won't interfere with them. Hold the blind up in the window to work out where to drill: normally 150mm in from the left, and 150mm in from the right.
-
Step 2 — Mark your drill points
Place your bracket's front edge 10mm back from the front of your wall recess — this keeps the blind flush with enough space to fit the wooden valance. You can install it deeper if you prefer. Mark where to drill with a pencil; you'll see a front and back hole for the screw. Blinds wider than 1200mm will need a support bracket in the middle.
-
Step 3 — Drill
Drill your marked points with a 6mm drill bit.
-
Step 4 — Fix the brackets
With the holes drilled, insert the Fischer plugs. Push the gold screw through the bracket(s) and into the wall, and fix in place with a Phillips screwdriver. Tip: an electric drill/screwdriver makes this much easier. Don't over-tighten — the bracket still needs to swivel slightly.
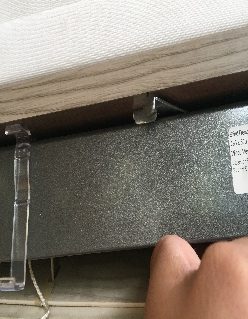
Blind up against the recess — open 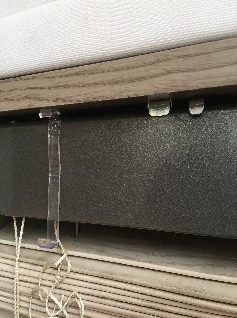
Blind fixed — bracket closed -
Step 5 — Fit the valance clips
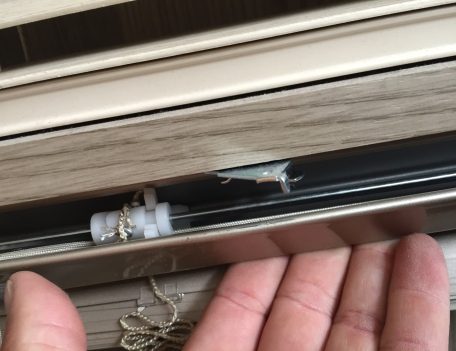
Take the valance clips and insert them into the headrail — it's best to place them where the ladder tape sits, this won't affect how the blind operates.
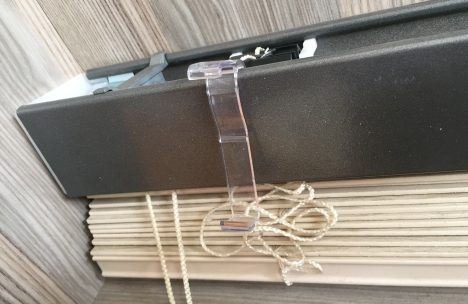
Valance clip fitted in the headrail -
Step 6 — Fit the blind
With all your brackets open, lift the blind up over the brackets and push it flush into the top of the recess. Holding the blind up with one hand, close each bracket one by one with the other. Before letting go, give the blind a gentle tug to check it's secure.
-
Step 7 — Test the cord lock
Take the cords and pull them gently to the opposite side of the control. You'll hear a small click — that's the cord lock releasing. Keeping your hand in place, slowly let go of the cord. The moment you move your hand back toward the control side, the blind will lock.
-
Step 8 — Tilt the slats
With the slats down, use the two single operating cords to tilt them by pulling down gently. Don't force them down once they've already tilted to a closed position.
-
Step 9 — Fit the valance
Cut the wooden valance to size if needed, then clip it onto the valance clips.
-
Step 10 — You're done!
Congratulations — you've installed your own blind! You now have a premium, custom-made blind backed by a full 2-year warranty. Tell your friends, and we'll be waiting for your next order.
Before You Start
Unpack your wooden venetian blind(s) carefully, taking care not to damage the blinds or cords when cutting through the packaging. Unwrap the plastic wrapped around the slats. Included with your blind(s): universal brackets, gold screws, Fischer plugs, a wooden valance with returns to cover your headrail, valance clips, and a blind cleaner.
-
Step 1 — Find your bracket positions
Look inside the headrail to familiarise yourself with the inner components — these keep the blind working smoothly, so make sure your brackets won't interfere with them. Hold the blind up in the window to work out where to drill: normally 150mm in from the left, and 150mm in from the right. We're installing your blind on the outside/front of your wall, so measure up 50mm.
-
Step 2 — Mark your drill points
Place your L-shaped bracket with its back edge flush against your wall — the wooden valance and its returns will cover and hide the sides of the blind for a neat, finished look. You can mount higher if you wish, just make sure you allowed for that in your measurements. Mark where to drill with a pencil; you'll see a top and bottom hole for the screw. Blinds wider than 1200mm will need a support bracket in the middle.
-
Step 3 — Drill
Drill your marked points with a 6mm drill bit.
-
Step 4 — Fix the brackets
With the holes drilled, insert the Fischer plugs. Push the gold screw through the bracket(s) and into the wall, and fix in place with a Phillips screwdriver. Tip: an electric drill/screwdriver makes this much easier. Don't over-tighten — the bracket still needs to swivel slightly.
Blind up against the bracket — open Blind fixed — bracket closed -
Step 5 — Fit the valance clips
Take the valance clips and insert them into the headrail — it's best to place them where the ladder tape sits, this won't affect how the blind operates.
Valance clip fitted in the headrail -
Step 6 — Fit the blind
With all your brackets open, lift the blind up over the brackets and push it flush into the top of the recess. Holding the blind up with one hand, close each bracket one by one with the other. Before letting go, give the blind a gentle tug to check it's secure.
-
Step 7 — Test the cord lock
Take the cords and pull them gently to the opposite side of the control. You'll hear a small click — that's the cord lock releasing. Keeping your hand in place, slowly let go of the cord. The moment you move your hand back toward the control side, the blind will lock.
-
Step 8 — Tilt the slats
With the slats down, use the two single operating cords to tilt them by pulling down gently. Don't force them down once they've already tilted to a closed position.
-
Step 9 — Fit the valance
Fit the wooden valance onto the valance clips.
-
Step 10 — You're done!
Congratulations — you've installed your own blind! You now have a premium, custom-made blind backed by a full 2-year warranty. Tell your friends, and we'll be waiting for your next order.
Roller Blinds: Filter, Screen & Blockout
Before You Start
Unpack your roller blind(s) carefully, taking care not to damage the blind or chain when cutting through the packaging. Unwrap the plastic protecting your blinds. Included with your blind(s): System 40 brackets, gold screws, Fischer plugs, and a child-safety chain tie-back.
-
Step 1 — Get to know your blind
On the control side you'll find a slide-in slot with a hook. On the other side, the spring-loaded operating pin. The hook and pin match the shape of the brackets you received. Check which way your fabric rolls — front roll (waterfall, covering the tube) or standard roll (from the back).
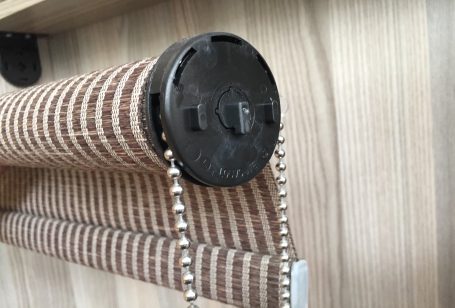
Control side — hook sits in the middle 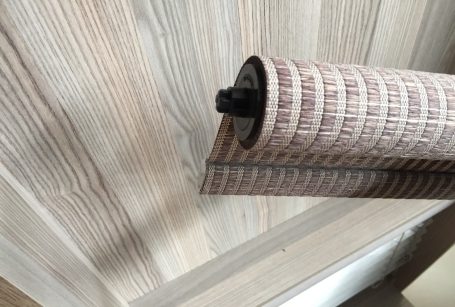
Spring pin side -
Step 2 — Check the fit
Hold your blind up in the window area to check it fits — the sides should almost touch the wall, leaving enough space to fit the brackets.
-
Step 3 — Mark your drill points
Hold a bracket against the middle of the side edge of your wall recess. Mark the two outer holes with a pencil, then repeat on the other side.
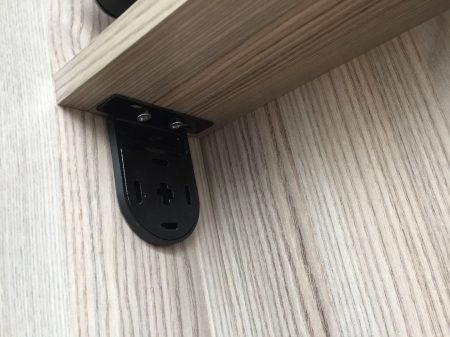
Bracket held against the recess, ready to mark -
Step 4 — Drill
Drill your marked points with a 6mm drill bit.
-
Step 5 — Fix the brackets
Insert the Fischer plugs, hold the bracket in position, then insert and tighten each gold screw with a Phillips screwdriver. Tip: an electric drill/screwdriver makes this part much easier.
-
Step 6 — Check they're secure
Once fixed, test each bracket by pulling it slightly. If it feels loose, remove the screws and refit — you don't want your blind coming down later.
-
Step 7 — Click the blind in
Hold the blind level against your recess wall and start with the control side. With the blind still rolled up, hook the control side into its bracket until it slides into place. Keeping the blind level, push the pin back into the tube with your finger. Once it's flush with the bracket, release your finger and adjust slightly until you hear the click of the pin locking in.
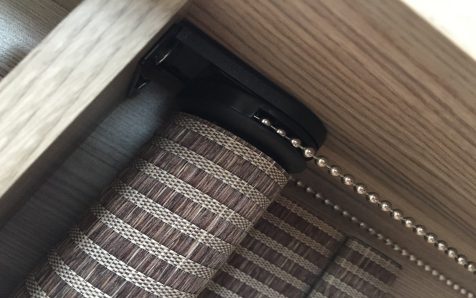
Control side hooked in 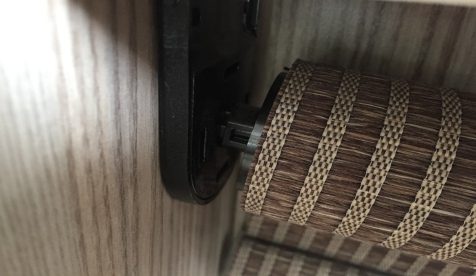
Pin side clicked into position -
Step 8 — Check it's secure
Test the blind is secure by pulling gently downward. It should hold firm.
-
Step 9 — Fit the child-safety tie-back
Secure the child-safety chain tie-back to the side where the chain loops. This step is optional, but recommended.
-
Step 10 — You're done!
Congratulations — you've installed your own blind! You now have a premium, custom-made blind backed by a full 2-year warranty. Tell your friends, and we'll be waiting for your next order.
Before You Start
Unpack your roller blind(s) carefully, taking care not to damage the blind or chain when cutting through the packaging. Unwrap the plastic protecting your blinds. Included with your blind(s): System 40 brackets, gold screws, Fischer plugs, and a child-safety chain tie-back.
-
Step 1 — Get to know your blind
On the control side you'll find a slide-in slot with a hook. On the other side, the spring-loaded operating pin. The hook and pin match the shape of the brackets you received. Check which way your fabric rolls — front roll (waterfall, covering the tube) or standard roll (from the back).
Control side — hook sits in the middle Spring pin side -
Step 2 — Mark the bracket outline
Hold the blind above the window area where you've measured, to check the fit. Check how much overlap you have on the sides, then hold the bracket in place and trace its outline with a pencil.
-
Step 3 — Mark your drill points
For larger blinds, get a second pair of hands to help keep the blind level. Mark the two outer holes with a pencil, then repeat on the other side.
-
Step 4 — Drill
Drill your marked points with a 6mm drill bit.
-
Step 5 — Fix the brackets
Insert the Fischer plugs, hold the bracket in position, then insert and tighten each gold screw with a Phillips screwdriver. Tip: an electric drill/screwdriver makes this part much easier.
-
Step 6 — Check they're secure
Once fixed, test each bracket by pulling it slightly. If it feels loose, remove the screws and refit — you don't want your blind coming down later.
-
Step 7 — Click the blind in
Hold the blind level against your recess wall and start with the control side. With the blind still rolled up, hook the control side into its bracket until it slides into place. Keeping the blind level, push the pin back into the tube with your finger. Once it's flush with the bracket, release your finger and adjust slightly until you hear the click of the pin locking in.
Control side hooked in Pin side clicked into position -
Step 8 — Check it's secure
Test the blind is secure by pulling gently downward. Your blind should now overlap the sides, top and bottom by at least 50mm, depending on the blind type and how you measured.
-
Step 9 — Fit the child-safety tie-back
Secure the child-safety chain tie-back to the side where the chain loops. This step is optional, but recommended.
-
Step 10 — You're done!
Congratulations — you've installed your own blind! You now have a premium, custom-made blind backed by a full 2-year warranty. Tell your friends, and we'll be waiting for your next order.
Vision Blinds
Before You Start
Unpack your vision blind carefully, taking care not to damage the blind or chain when cutting through the packaging. Unwrap the plastic protecting your blind. Included: an open-type cassette, gold screws, Fischer plugs, and a child-safety chain tie-back. Always keep the blind level, and never remove it from the cassette — the front piece of material is fixed to it.
-
Step 1 — Get to know your blind
On the control side you'll find a slide-in slot with a hook; on the other side, the spring operating pin. Inside the open cassette you'll see the fixed brackets on the sides, matching the shape of the hook and pin.
-
Step 2 — Mark your drill points
Check your blind fits perfectly. Hold your bracket with the flat side facing back and the loop facing forward. Measure 50mm from the side and 30mm from the front edge of the wall — this is where you drill. Blinds wider than 1200mm will need a supporting bracket in the middle.
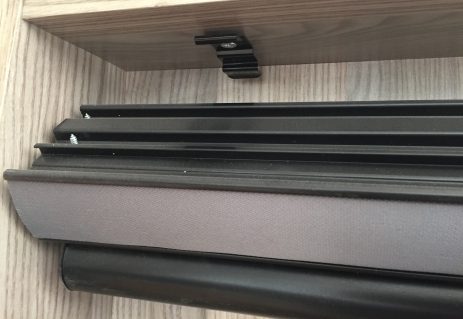
Bracket fitted to the side of the recess -
Step 3 — Fix the brackets
Drill with a 6mm bit where marked, then insert the Fischer plugs. Fit the gold screws through the bracket and into the plugs, and tighten with a Phillips screwdriver. Tip: an electric drill/screwdriver makes this easier. Make sure the clips sit tight and face you perfectly straight.
-
Step 4 — Find the clip grooves
Look at the top grooves of your blind — this is where the brackets clip and fix to the wall. Always start with the front clip.
-
Step 5 — Clip the blind in
Keeping the blind level, angle it so the back sits slightly lower than the front. This lets you clip the front into the loop shape of the bracket. Do this for every bracket first, then push the back of the blind up — pushing it toward you to get the click. Move to the next bracket once you hear it.
-
Step 6 — Check it's secure
Pull gently down on the blind at each bracket to test it's secure. If it feels loose, push the back of the blind again until you hear the click.
-
Step 7 — Fit the child-safety tie-back
Secure the child-safety chain tie-back to the side where the chain loops. This step is optional, but recommended.
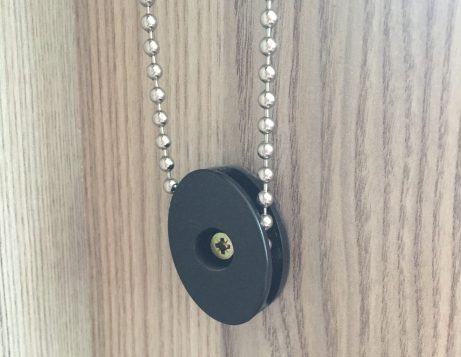
Child-safety chain tie-back -
Step 8 — You're done!
Congratulations — you've installed your own blind! You now have a premium, custom-made blind backed by a full 2-year warranty. Tell your friends, and we'll be waiting for your next order.
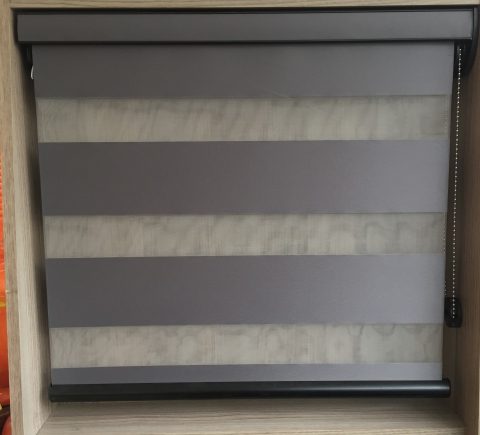
A perfectly installed Vision blind
Before You Start
Unpack your vision blind carefully, taking care not to damage the blind or chain when cutting through the packaging. Unwrap the plastic protecting your blind. Included: an open-type cassette, gold screws, Fischer plugs, and a child-safety chain tie-back. Always keep the blind level, and never remove it from the cassette — the front piece of material is fixed to it.
-
Step 1 — Get to know your blind
On the control side you'll find a slide-in slot with a hook; on the other side, the spring operating pin. The hook and pin match the shape of the brackets you received.
-
Step 2 — Mark your drill points
Make sure your blind overlaps the window opening — normally 50mm on each side and on the height, depending on how you measured. Place your L-shaped brackets 50mm above the corners, flush with the wall, and mark within the holes where you'll drill.
Bracket fitted to the side of the recess -
Step 3 — Fix the brackets
Drill with a 6mm bit where marked, then insert the Fischer plugs. Fit the gold screws through the bracket and into the plugs, and tighten with a Phillips screwdriver. Tip: an electric drill/screwdriver makes this easier. Make sure the clips sit tight and face you perfectly straight.
-
Step 4 — Find the clip grooves
Look at the top grooves of your blind — this is where the brackets clip and fix to the wall. Always start with the front clip.
-
Step 5 — Clip the blind in
Keeping the blind level, angle it so the back sits slightly lower than the front. This lets you clip the front into the loop shape of the bracket. Do this for every bracket first, then push the back of the blind up — pushing it toward you to get the click. Move to the next bracket once you hear it.
-
Step 6 — Check it's secure
Pull gently down on the blind at each bracket to test it's secure. If it feels loose, push the back of the blind again until you hear the click.
-
Step 7 — Fit the child-safety tie-back
Secure the child-safety chain tie-back to the side where the chain loops. This step is optional, but recommended.
Child-safety chain tie-back -
Step 8 — You're done!
Congratulations — you've installed your own blind! You now have a premium, custom-made blind backed by a full 2-year warranty. Tell your friends, and we'll be waiting for your next order.
A perfectly installed Vision blind
Child Safety
Blinds with cords or chains — rollers, Vision blinds, and corded venetians — carry a strangulation risk for young children if cords are left loose or within reach. A few simple habits make a big difference:
- Always fit the child-safety tie-back or cord tidy included with your blind, and keep it pulled taut against the wall.
- Never tie cords together, and don't let them twist into a loop.
- Keep cords out of reach of young children — move cots, beds, and furniture away from any window covering cords.
- If your blind uses breakaway connectors on the chain, don't reconnect a broken one until you've checked it isn't damaged.
- Consider cordless or motorised options in children's rooms and play areas.
If anything about your blind's cord or chain safety mechanism looks damaged or isn't working as described above, stop and give us a call before using it.